
Create Multiple Disabled States - Video Tutorial
Client: Concept Project
Year: 2023
Categories: Tutorial
Skills: Instructional Design, Voiceover, Video Editing, Graphic Design
Tools: Articulate Storyline 360, Camtasia, Adobe Audition
The Concept
The idea for this tutorial came about from a conversation I had with several people learning Articulate Storyline 360. They had questions about how the built-in states work and when it’s useful to create your own custom states. Because I had recently come across this issue while developing my scenario project, “Avoiding Phishing Scams", I thought making a tutorial outlining the steps to create multiple custom disabled states for a single object would be beneficial.
The Process
To create a tutorial, I always start with an outline of the steps involved, which will then turn into the script. If it’s a process unfamiliar to me, I will first meet with the SME for a demo and explanation of the process. After the outline, I will create the storyboard, which I consider to be the most important part of the process. Once the storyboard is finished, I can move on to audio recording and editing. I then listen to the final audio as I do the screen recording and finish by editing everything together.
Outline and Script
The outline allows me to write down the process in a step-by-step format from start to finish, including any tips or tricks along the way. During this stage, I will walk through the process as many times as needed to ensure each step is accounted for.
I then turn the outline into a script, keeping a conversational and helpful tone throughout.
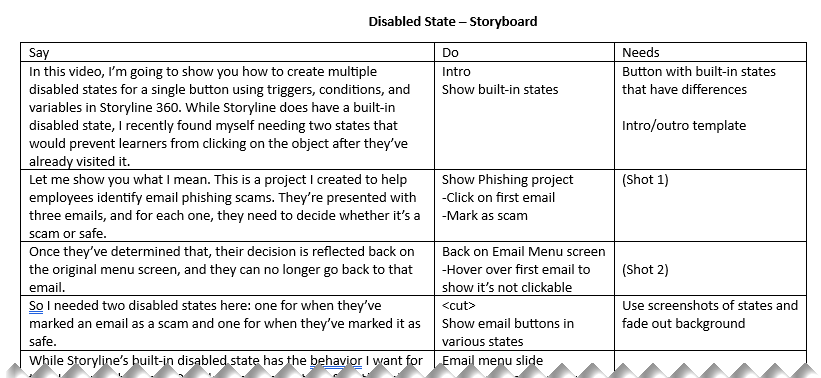
Storyboard
For me, the storyboard is the most important step when creating a tutorial. I use a Say - Do - Needs format for the storyboard. The “Say” column contains the script. The “Do” column contains a description of what will happen on screen. The “Needs” column contains what I need to accomplish the shot - in this case, I referenced my shot list along with other screenshots to display, items I would need to pre-build in Storyline, etc.
In this case, my storyboard became more complex because I needed to jump from one recording to another. I like to handle this by creating a shot list that tells me the steps I need to take for each screen recording. It helps simplify the process and then I know exactly when each clip needs to appear when editing.
Recording and Editing
I recorded and edited my audio first, using Adobe Audition. My preference is to use a real human voice rather than an AI-generated voice, although AI is improving with time. I listen to that pre-recorded audio as I record the steps on screen. This works most of the time, but it did pose an issue for this video as the audio went faster than I was able to perform the steps on my computer. To work around this, I referred to my outline and shot list and recorded the steps in sequence. This caused the editing to take longer as I had to slice clips and extend frames to sync up the audio and video.
Final Thoughts
I found this project to be fairly straightforward. The main challenge I faced was needing to record the steps out of sync with the audio, which always makes the editing process take longer. There was no way around this as I knew I was going to speed up certain processes (typing, repeating steps, etc.) in editing. I also would have liked to include professional voiceover; however, that was not in the budget.